Summary
Dark Souls 2offers more bosses than any of the otherDark Soulsgames. Many of the bosses have unfair advantages that aren’t found in the otherDark Soulsgames, often outnumbering the player, something that many new players could find overwhelming. Many of the bosses are also extremely powerful, and combined withDark Souls 2’scurse system, can easily one-shot the player if they’re not careful.
Dark Souls 2has over 30 bosses that are ready to steal the Bearer of the Curse’s souls time and time again, and many of them will have the player fight more than one foe at a time. Arguably, these are some of thehardest bosses inDark Souls 2.

Updated on 17 July 2025, by Harry Ted Sprinks: WithElden Ringgetting closer to two years of age, there’s never been a better time to look back on FromSoftware’s older games, and Dark Souls 2 is arguably the best example of innovation and experimentation that (through years of iteration) led to Elden Ring’s success. Dark Souls 2 was known for its mechanical quirks and strange ideas that polarized fans of the first game. Like Elden Ring, thedifficulty of each boss in Dark Souls 2is semi-dependent on a player’s build and strategy, and fans of Dark Souls 2 often have very different ideas about which of them are the most powerful and difficult.
20Royal Rat Authority
Location: Doors of Pharros
Found in the dark and flooded caves of the Doors of Pharros, this optional boss is an infamous fightin an infamous game, thanks to the four smaller rats that accompany it, as they can very quickly afflict the player with poison and make the fight much more difficult.
Tips For Defeating Royal Rat Authority
If players take out these smaller rats asquickly as possible, potentially with a ranged spell such as Homing Soul Mass or a two-handed cleave, the fight becomes much easier. From there, players should deal with the Authority like they would any largeDark Soulsboss: stay under its legs and smack them, just watch out for its leaps and lunges, and make sure its little rat friends are dead.
19Mytha, The Baneful Queen
Location: Upper Earthen Peak
As there are often very few hints to the obscure mechanics that can be found inDark Souls 2, players may come across challenges that they are woefully unprepared for. One such occurrence is while fighting Mytha, the Baneful Queen in the Earthen Peak.
If one does not burn the windmill in this area, the boss room will be filled withgreen slime that will not only poison the player but heal Mytha as well.After setting the blades of the mill aflame, the player will also gain access to Jester Thomas as a summon, which can help out playersstruggling with this boss.

Tips For Defeating Mytha
Before the fight, make sure to travel to where the windmill blades are and burn them. This will make the fight easier by draining some of the poison in the boss arena. The arena is typically covered in poison, but when the windmill is burned,the poison will only be on the edge.
Mytha typicallyattacks with her spear two or three times in a row, before leaving an opening for attack.Wait for the opening and strike once or twice, then prepare for another attack. Listen for screams, which indicate the magic beam attack that fires from her severed head. Finally, try not to stand behind her for too long. This will typically cause her to use her tail attack to grab the player, dealing harsh damage.
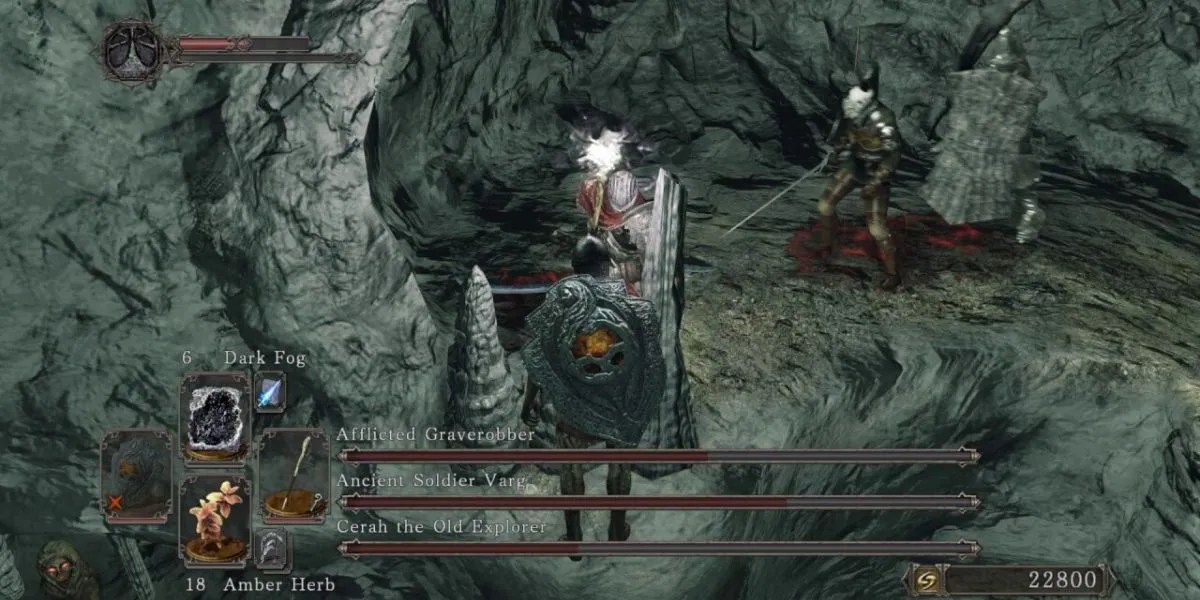
18Afflicted Graverobber, Ancient Soldier Varg, & Cerah The Old Explorer (Crown of the Sunken King DLC)
Location: Cave of the Dead
Although there are three of them, this boss fight offers little challenge if players are patient and focus on the enemies individually. Like many of the boss fights inDark Souls 2, it’s fairly obvious that this wasmeant to be played in co-op, but it’s more than possible to defeat them solo - it’s just tedious. However, if they wish, the player getstwo summons before the boss fightif they choose to face this trio without other players.
Tips For Defeating The Afflicted Graverobber, Ancient Soldier Varg, & Cerah The Old Explorer
It is important togo after the Afflicted Graverobber first,since he is the fastest of the trio. If possible, always summon some spirits to help in the fight. If that cannot be done, take time to practice parrying, since it will come in handy when dealing with the Graverobber. Deal with Varg last, since he has the highest health pool. His attacks are slower, and he’s also the slowest.
17Twin Dragonriders
Location: Drangleic Castle
For this fight, the original Dragonrider (found in Heide’s Tower of Flame) returns with a shiny coat of red paint and a ranged friend, making the fight a lot more strategic and difficult to maneuver.
Tips For Defeating Twin Dragonriders
Players may default to fighting the red Dragonrider and simply putting up with the constant stream of arrows until, eventually, the archer jumps down from their pedestal and switches to melee. However, a good strategy is to bait the red Dragonrider into knocking the ranged one from their perch and taking them out first, as they have significantly less health.
16Belfry Gargoyles
Location: Belfry Luna
The Belfry Gargoyles are another optional boss and one that is probably best to skip. This fight also features multiple enemies that stack the odds against the player. In total, there aresix gargoyles that come into the fight one at a time.The spawn rate for them is rather short, however, and if they aren’t defeated fast enough, players can easily get overwhelmed by their numbers.
If that wasn’t bad enough, when a gargoyle’s health is reduced to half, they start to breathe fire which can easily destroy the player when dealing with multiple gargoyles. ensure to at least go into this fight with somegold pine resinfor that much-needed lightning buff onthe player’s weapon.

Tips For Defeating The Belfry Gargoyles
Speed is the keyto defeating this boss easily. When no help is available, players should try to take out one gargoyle at a time. Remember that the fight starts with two gargoyles, and the third won’t spawn until the overall boss health is less than 90%.Focus on one gargoyle and use pine resin if possible.Also, remember that the physical attacks from the gargoyles can be parried. This is useful to know when dealing with just a few of them.
15The Duke’s Dear Freja
Location: Brightstone Cove Tseldora
The main annoyance of this fight is the constant stream of smaller spiders that are summoned throughout. Freja, who can be found in Brightstone Cove Tseldora, is one of the four ‘Old Ones’ and guards a Primal Bonfire that returns players to Majula. Defeating them will grant the player one of the four Great Souls required to progress.
Tips For Defeating Freja
The best way to deal with Freja is tobait out her beam attack. After it ends, run in and attack her head, then get out of the way of her legs or lunging attack. Players can also run to the opposite side of the spider and attack the head that’s idle, just be careful of Freja’s stomping legs.
Carrying a torch can help scare away the smaller spiders, but in general, it’s best to bring a weapon with high fire damage, as both Freja and her children are weak to fire. If the player uses a weapon with a swinging arc and high fire damage, it’s possible to carve through the smaller spiders extremely quickly, even taking them out collaterally as the player attacks Freja.

14The Pursuer
Location: Forest of the Fallen Giants
This boss is technically optional if the player goes through the Dead Man’s Wharf to fight the Flexile Sentry as well as defeat the Ruin Sentinels, but most players will end up fighting the Pursuer as the path to him is quite clear. The Pursuer is perhaps one of the hardest opening bosses in the franchise. His moveset is generally unforgiving, and he can applyDark Souls 2’s unique curse mechanic that only makes subsequent attempts even less forgiving.
Tips For Defeating The Pursuer
In the Pursuer’s arena is a ballista that players can activate, shooting the boss and dealing massive damage. In general, this is the easiest and quickest way to defeat the boss, but it can be a little tedious to set up and pull off. The easiest way to defeat the Pursuer outside of the ballista is to learn how to parry them, which makes the fight a lot easier.
In general, players should try to bait out his lunging attack, as it’s fairly easy to dodge and the player can get in some quick hits as the Pursuer recovers. Most importantly, when the Pursuer draws back his right arm and his sword glows blue, players should get ready to dodge, as this move will impale the player, cursing them, and leaving them vulnerable afterward.

13Ancient Dragon
Location: Dragon Shrine
Players don’t have to fight the Ancient Dragon, but attacking him will trigger a boss fight and display the dragon’s ratherlarge amount of health.It is recommended to have a few summons for this fight, otherwise, it can last an extremely long time.
The boss mainly deals fire damage, but will also attack with its claws and tail if players linger around it for too long. It also has the potential to fly up into the air and cast a very large AOE attack that reaches almost the entire arena. It is highly recommended towear armor with good fire resistancebefore attempting to take on this behemoth.
Tips For Defeating The Ancient Dragon
The best way to make this boss fight easy is to getas much fire resistance as possible. This can be done by equipping the Flame Quartz Ring +2 (100 fire resistance), Dispelling Ring (60 fire resistance), Dragon’s Tooth (50 fire resistance), and high fire-resistant armor. Players will also want spells likeFlash Sweatto further increase their resistance. After all this, the boss fight should be rather trivial, since the fire damage will be taken out of the equation.
12The Ruin Sentinels
Location: Lost Bastille
Players encounter the Ruin Sentinels rather early on inDark Souls 2, depending on which route they take at the beginning of the game. It is possible to skip this trio of bosses, but not without first finding theAntique Key and a Pharros Lockstone. The fight can be overwhelming due to the relentlessness of the Sentinel’s attacks, as well as the sheer number of them.
Tips For Defeating The Ruin Sentinels
The easiest way to handle the Sentinels is to take advantage of the second-floor landing that players will drop onto when entering the boss fight.Stay here and don’t jump down. This will typically cause only one Sentinel to jump up and attack, while the other two hang out on the ground for a while. However, players will need to be fast, as eventually, the other two Sentinels will jump up to assist their companion. When this happens, it’s best to jump down and take advantage of the arena’s space, as players won’t be able to consistently avoid the Sentinels' attacks from the small space of the landing.
If players are able to successfully defeat, or nearly defeat, the first Sentinel to jump onto the landing, fighting the other two should prove simple. The Sentinels tend to attack fairly relentlessly, so the key to this fight (likemanyDark Soulsbosses) is patience. Wait for the right moment to attack, and take the fight slowly. Players can also use the help of the summon from the hallway before the boss room. This spirit is able to tank many of the Sentinels' attacks while the player chips away their health.

11Throne Watcher & Throne Defender
Location: Throne of Want
The Throne Watcher and Throne Defender are the last fight before the final boss (excluding the Scholar of the First Sin) and can be a real danger if the player isn’t careful. As always, fighting two enemies at a time can be tricky, but this fight can easily be done solo.
Tips For Defeating The Throne Watcher & Throne Defender
When players defeat one of the bosses, they aren’t immediately defeated. Instead, they will kneel in a downed position for a moment and eventually the other will revive them. Because of this,it’s important that the player defeats both bosses within 20 seconds of each other, or they’ll be trapped in a constant cycle.
Players should be wary of the ledge at the edge of the arena, as it’s very easy to fall off when kiting the bosses. However, the ledge can also be used to the player’s advantage, as it’s possible to trick one of the bosses to fall off. The best way to succeed in this fight is to keep both bosses at a low amount of health and then finish them off in quick succession.


